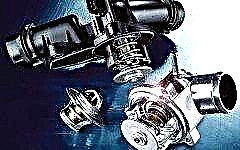
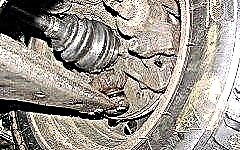
Every experienced driver - the owner of a front-wheel drive "iron horse" knows about such a car unit as CV joint. The abbreviation means constant velocity joint. This unit is designed to transfer torque from the car motor to the wheels. In common parlance, the CV joint is called a "grenade".
SHRUS device

The CV joint was invented in the 20s of the last century. He helped to cope with the problems of loss of power on bends, vibration and uneven distribution of torque in highly passable and maneuverable front-wheel drive vehicles. The knot, thanks to which the wheels can easily change the angle, consists of two "grenades": an internal and an external one. They differ in design and purpose.
The inner "grenade" is connected to the transmission. It transmits torque through the drive shaft to an external "grenade" located on the hub. The inner CV joint ensures the movement of the axle shaft.
An external "grenade" transmits torque to the wheels. She has a fairly large angle of rotation, and she takes significant loads, so it breaks down more often. The inner CV joint is larger, the outer one is smaller.
Since the "grenade" is highly reliable, many believe that with proper operation and proper care, this unit will never fail. But this opinion is erroneous. Despite the fact that modern lubricants significantly reduce the coefficient of friction that occurs when various parts come into contact during operation, it continues to be the main cause of malfunctions.
So with the SHRUS, as with other auto mechanisms, problems may arise. Oddly enough, but the breakdown of this part in front-wheel drive cars is far from uncommon. It cannot be repaired - only completely replaced. If this happened in your car, you will have to decide - replace the unit yourself or go to a car repair shop, but it will be expensive.
Our article will be useful for those who have chosen the first option. It is quite possible to change the "grenade" yourself, and with proper preparation it can be done in an hour.
Why CV joint breaks

As mentioned above, the main cause of CV joint failure is friction. There is no way to get rid of this factor. One can only advise to update the lubricant in a timely manner.
In addition, it is often necessary to replace the "grenade" due to wear of the rubber boots that protect the joints in the mechanism. When riding on them, cracks and holes form, into which dust and dirt get. If the anthers are in this condition, they cannot protect the mechanism, the lubricant will become clogged, and the "grenade" will fail.
To detect damage to the anthers, listen - if, when turning to the left, a crackling sound is heard in the right wheel, and when turning to the right - in the left, then the wear has reached its limit.
Another reason for the breakdown of the CV joint is associated with the ball joint. When it wears out a lot, there is a backlash in it. If this situation is ignored, it will negatively affect the hinge. The end result is that when driving at high speed, he will pull out the support pin, because of this, the "grenade" will break.
In rare cases, the "grenade" can break down due to the original factory defect in spare parts or improper installation. And finally, damage to the hinge can be triggered by improper actions of the driver - accelerating the engine with slipping, braking by the gearbox, starting movement on inverted wheels.
How to determine the malfunction of the CV joint

It is not difficult to change the "grenade" yourself, but first you need to identify which element of this node is broken. If the inner race is worn out, the hinge will play. This can be detected by hearing a specific crackle on the bends or by feeling light jolts on the steering wheel. This is especially noticeable on cars without electric or power steering. Then the "grenade" needs to be changed using original spare parts.
When the boot is worn, dust and dirt get into the joints of the CV joints. This can cause the joint to pop out of the drive shaft or transmission, preventing the vehicle from moving further.
If, when starting off, there are shocks, or at low speed the motor abruptly changes its work, this may also be due to damage to the CV joint. To make sure of this, we hang out the front suspension of the machine one by one, fix the main gear shaft and turn the wheel in different directions. A faulty CV joint will respond with a knock with significant free rolling of the wheel.
There are two tests that determine which CV joint has broken - external or internal. The first test checks the performance of the external "grenade", and the second - the internal one:
- On a large flat area, unscrew the steering wheel all the way to either side. We turn on the first speed and start off sharply. If you hear a characteristic crunch, then you need to change the outer CV joint. The faulty mechanism is located on the side to which the steering wheel was turned. The louder the sound, the more the part is worn out.
- We find the area where there is a shallow ditch. We move by car towards the trench in such a way that one front wheel gets into it much earlier than the other. If a crunch appears when driving through the trench, it means that the inner CV joint of the wheel that has fallen into it at that moment is faulty.
To inspect the inner CV joint, we drive the car onto the lift so that it is slightly raised, and turn on the first speed. We slowly spin the wheels. If you hear a distinct crunch, then the internal "grenade" needs to be changed.
What is needed to replace the CV joint

Are you planning to change the "grenade" (it doesn't matter - external or internal) yourself? Stock up on the following tools:
- hammer, screwdriver, pliers, jack;
- a set of keys and heads;
- locksmith's vice;
- a pry bar or a sufficiently long pipe.
You will also need new seals, anthers, a hub nut with a stopper, and a lubricant. These consumables are usually provided with a new grenade.
Replacing the CV joint

For repairs, the car is driven onto a pit or a lift, or it is installed on a level platform and is locked with wheel chocks that block the rear wheels. The gear lever is moved to the first speed position.
The sequence of work depends on which CV joint is required to be replaced - external or internal. Experts believe that it is better to change both nodes at once, since then you will not have to do the same job again. But in any case, you first need to remove the axle shaft from the car and disassemble it... This is done like this:
- Using the wheel wrench, loosen the front wheel bolts on the broken side.
- We put a jack under the threshold.
- For convenience, we unscrew the drain plug and drain a little oil from the gearbox.
- To prevent the car from falling off during repairs, raise the wheel and place bricks, a stump or two old tires under the car.
- Unscrew the wheel bolts and remove the front wheel.
- We loosen the wheel hub nut - insert the head by 30 and attach a key to its end. We insert a pipe into the opposite part of the key and, using it as a lever, unscrew the nut and take it out. A pry bar can be used instead of a pipe.
- We unscrew the bolts that attach the outer CV joint to the main gear shaft.
- We remove the axle shaft from the car together with both CV joints.
- Using a technical guide or our own experience, we disassemble the semi-axis. Using a special puller, remove the retaining rings that fix the CV joints on the shaft.
Then we proceed directly to the replacement of CV joints:
- Unscrew the brake caliper fixing nut, remove it and set it aside.
- We unscrew the fasteners of the lower ball joint and remove the hub from the steering knuckle.
- We unscrew the hub and, using a hammer, knock out the outer CV joint, twisting it along the axle shaft. To knock out the CV joint from the retainer without damaging the axle shaft slot, we use a wooden block, easily tap through it with a hammer.
- We turn off the cuff securing the boot of the inner CV joint.
- We pull the old boot and cuff along the drive shaft and discard it.
- Remove the housing, the three rollers and the retaining ring that secures the 3-spoke yoke to the shaft.
- We turn the wheels to the limit and knock out the internal "grenade" from the transmission.
- We install new "grenades" together with the boot and the cuff, after having lubricated it, and fix it in the hub. Sometimes it is difficult to put the tripoid inner CV joint back into place, as the rollers do not fall into the grooves the first time. Then you just need to rotate the drive shaft: after a few turns, the spare part will snap into place.
After mounting the CV joints on the semi-axle, we put it back on the car in the reverse order. We remove the car from the jack and be sure to tightly tighten the hub nut and the bolts of the outer CV joint, with which it is attached to the main gear shaft. Then we check the nut. Don't forget to add gear oil.
If the "grenade" is serviceable, but its attachment to the car's shaft has weakened, we simply tighten the bolts holding the mechanism. The bolts must be tightened with effort. The tightening torque must be in accordance with the manufacturer's requirements. Otherwise, after some time, the "grenade" will loosen again, and this threatens with new costs to fix the problem and an emergency situation on the track.
Conclusion
Regular inspection and timely troubleshooting of the car will help reduce the risk of accidents and allow the car owner to remain a driver, and not turn into a pedestrian.
Make sure that dirt and water do not get under the rubber clamps of the hinges, and then this mechanism will serve for a long time. And never ignore the crunch, because the consequences can be very sad. For repairs, use original spare parts whenever possible.

|| list |
- SHRUS device
- Why CV joint breaks
- How to determine the malfunction of the CV joint
- What is needed to replace the CV joint
- Replacing the CV joint